The Calendar is automatically created for your Classroom and you just need to make it so anyone with the link can see it as well as share out the link with parents. If you follow the steps below, you should be sharing out with parents in no time.

Friday, November 20, 2015
Share your Google Classroom Calendar with Parents
When Google added the Calendar integration with Classroom, they pretty much released another feature that many had wanted, sharing with parents. Now, parents still can't log into Classroom unless they use their student's information but they can easily see the Calendar that is created with that Classroom to see due dates for assignments. This is a great first step and can be a good start to having some communication with parents.
The Calendar is automatically created for your Classroom and you just need to make it so anyone with the link can see it as well as share out the link with parents. If you follow the steps below, you should be sharing out with parents in no time.
The Calendar is automatically created for your Classroom and you just need to make it so anyone with the link can see it as well as share out the link with parents. If you follow the steps below, you should be sharing out with parents in no time.
Thursday, November 19, 2015
Zaption Presenter Tools
Zaption, a tool that allowed you to embed questions and student feedback into a video, has come out with some updated tools that are useful for a whole-class activity. Now, if you are going to show a video to your class, keep it short and to the point. There is hardly a time where we need to spend a whole class period watching one video when there may only be at most 5-10 minutes of stuff we need to see or discuss. Focused instruction is better than just wasting time to watch something.
You first have to create a video set in Zaption that has questions in it to begin. Instead of giving students the link to do as homework or as an assignment, you click on the Present button to start it on your computer. You can project this onto the screen and the students can go to the site using the link and code in the presentation. Students do not need accounts to participate but they can or they could just enter their name instead. As you reach the questions in the video, the questions will also appear on the student's device. They select their answer or write it out if it is not a multiple choice question and all of the answers will appear on your screen. You can then discuss the answers with the students or move onto the next part. The teacher can also add questions on the fly or pause and use the drawing tool to annotate the screen or write something out.
This tool also allows students to "raise their hand" by typing out a question they have. This could make it much easier for some students to ask questions by using the program instead of raising their hand in the class. Their questions are just as important but due to nervousness or fear, they may not normally ask them. I am always looking for ways to make sure we can engage all learners, especially those that do not feel comfortable asking questions or talking in front of the whole class.
You can see Zaption's own video explaining this new tool by going to here or you can watch my video below which includes the student view on my iPad.
Monday, November 16, 2015
How to Check if a Student Filled Out a Form
The following is a guest post by Nick Lachen, Physics teacher at AHS.
Hello! The following will create a table to tell you whether a student has completed a google form with filters like the period. You will need the following:
- a full roster with student identifier (e.g., name, email, id #) -I use email
- that student identifier in your google form (can check in google form, see below)
- Full name (if not using already as identifier)
- The period the student is in
- A google form (and sheet response sheet)

Basically, ask for them to insert their first name, last name, period, and email in a google form. You can copy and paste this to use in future forms. (asking their first name and last name separate is okay, you can use the =concatenate(columnthathasfirstname, “ “, columnthathaslastname) function to make combine it into the full name)
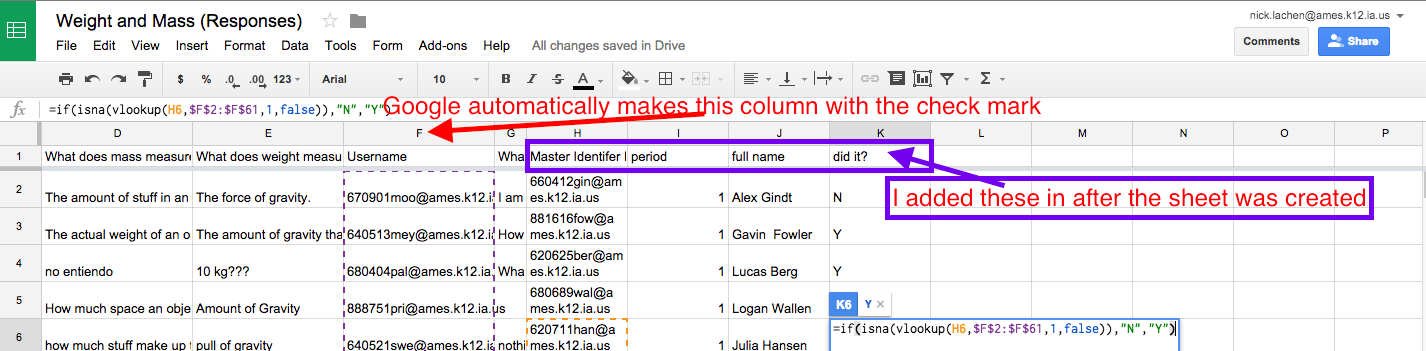
The responses from a google form will be put into a google sheets. We will be using a function to identify whose name is on the google sheet, i.e., they completed the form. The function is the following: =if(isna(vlookup(H6,$F$2:$F$61,1,false)),"N","Y")
in other words:
=if(isna(vlookup(MASTER LIST IDENTIFIER,RANGE WHOSE IDENTIFIER IS ON THE FORM,1,false)),"No they didn’t do it","Yes they did do it")
This looks like the following:
The function is checking if the email is present in the area you select, in this case H6. Then it looks in the master list/range to see if if it is in that section, in this case $F$2:$F$61.
If the email is present, then it will output Y. If it is not, it will output N. You can change this to whatever you would like.
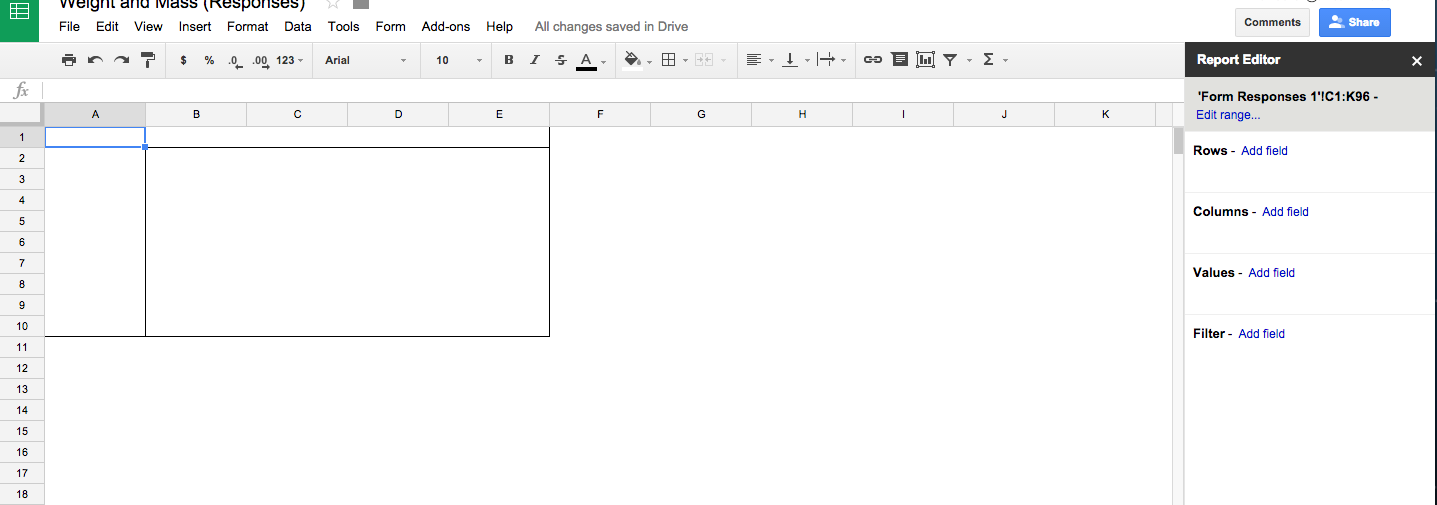
Highlight the student’s full name, period, did they do it (y/n) and select the pivot table option under Data. This will create a table in a new tab (located at the bottom of the sheet). Looks like this:
Now, add what you want to see, for example:
- row: Full name
- Column: did it?
- Values: doesn’t actually matter
- filter: period AND did it?
This will look like the following:
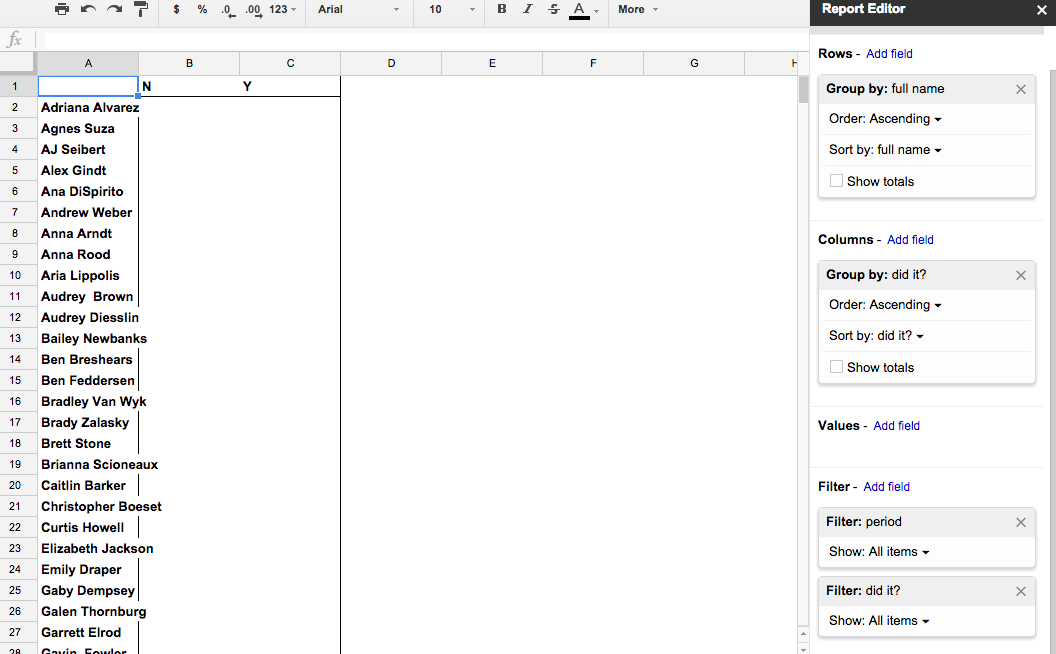
This table shows all of the people in all of my classes who did AND DID NOT fill out the form.
We can edit the filters to show only one period and only who did not do it by clicking on show all items so we arrive at:
This is the list of all of my first period students who DID NOT fill out the form, and in alphabetical order. This is useful for participation and to how many of a class did/did not look at a form. 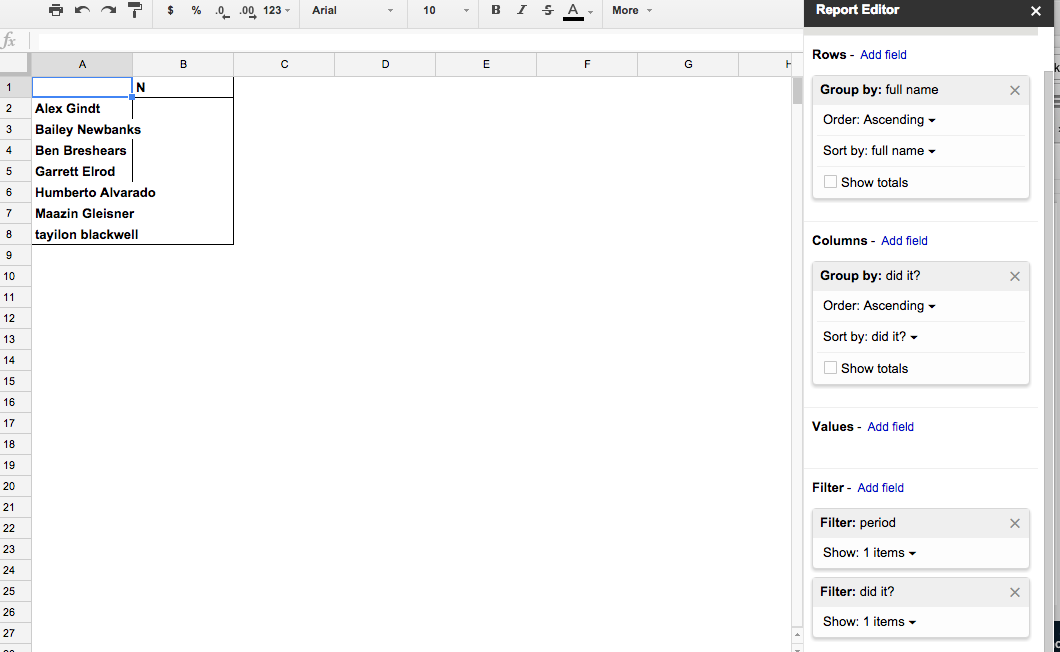
Notes: I unchecked show totals in the row and column.
Adding a value to show will just show a zero or the name or something. The list that is there is what is important.
contact nick.lachen@ames.k12.ia.us or patrick.donovan@ames.k12.ia.us for questions
Thursday, November 12, 2015
Edcamp Iowa 2016 - AMES!
Edcamp Iowa was the first Edcamp that I ever went to and I have been hooked on Edcamps since then. I have traveled up to the Twin Cities and down to Kansas City for Edcamps. Every Edcamp that I go to has been a great learning experience and has reenergized me as an educator.
Edcamps are the true form of personalized learning as you control what topics there are during the day and you vote with your feet, if that session does not meet your needs then you just go to one that will. Edcamps are only as effective as the people that attend, the more that show up and the more that participate, the better. There are no presenters, there are no handouts, and there are no corporations runnings sessions.
Edcamp Iowa usually happens in 5 locations around the state at once and this year we are hosting the central location here in Ames. On Saturday, February 13th at Ames Middle School we will be having a great day of learning.
If you want more information, you can go to the site at http://edcampiowa.org/ or watch any of the videos below. If you are already sold on the Edcamp and want to register, you just need to go to http://www.eventbrite.com/e/edcampiowa-2016-tickets-19350455734
It is free and it is what you make of it, bring along others to make the day even better. If you have any more questions, please free free to email me at patrick.donovan@ames.k12.ia.us
My video introducing Edcamp Iowa - Ames.
Great video posted by Bill Selak
Thursday, November 5, 2015
Adding Text to iMovie Workaround
Adding text onto images or video files inside of iMovie is not always easy with the limited selection of options. By using Google Drawing you can easily add text over your video. Just create the text you want in Google Drawing, using the large variety of fonts and formatting, leave the background as it was and then download as a PNG file. You can then drag that PNG image into iMove, remove the Ken Burns effect and make it a picture in picture setup, and then arrange the text where you want.
Watch the video below to see how to do this.
Watch the video below to see how to do this.
#AmesCSDchat at 8pm on November 17
As part of our monthly challenges at AHS and something that we have wanted to do for a while, we are having our first district Twitter Edchat. At 8pm on Tuesday, November 17 we will be using the hashtag #AmesCSDchat to conduct an Edchat with teachers in Ames. This will be a great learning experience for those new to Twitter chats and will offer us a chance to have conversations that we don't normally get to, due to time or location.
Twitter chats are a great way to connect with other people and have conversations over the same topic. There are some major chats out there, #iaedchat is every Sunday morning and night, but this will offer us a chance to have a conversation with our own teachers.
Cybraryman has some great resources related to Twitter chats at http://cybraryman.com/chats.html
I made two videos to get people ready, the first is a general overview and the second is how you can get Tweetdeck set up for this. Make sure you have your full name visible and you have a real profile picture, instead of that egg.
Come ready to learn together and have some great conversations.
Friday, October 23, 2015
ITEC Resources and Reflections
ITEC was just last week but I am just now posting my resources and reflection. As usual, ITEC was a great chance to learn and connect with other great educators from in and out of Iowa. There were a ton of great sessions and thanks to Twitter I was able to follow along with those sessions that I was not in.
Big Resources
Big Resources
- My Flipboard magazine of resources - As I did last year, I used a Flipboard magazine to curate resources I was getting from ITEC. I was fortunate to partner up with Josh Allen (@j_allen) to collaborate on this magazine. You should find some good resources in there.
- ITEC Presenter resources - ITEC posted all of the resources that presenters submitted before and during the conference.
- #ITECia - You should still be able to get some great resources from people who are still posting to Twitter using the official hashtag.
- Video as an Instructional Tool and Moving Beyond the Textbook - these are the resources from my own sessions.
Takeaways
- Gamification - I went to a number of sessions about gamification, both in the classroom and for professional development. The main ideas behind games can be easily applied in the classroom and can improve the ability for students to maintain a growth mindset. The idea that you can fail and still have "lives" left is something that can help classes and PD out. As we have implemented our own form of gamification for our PD, I am evaluating how we need to modify it to improve it. I am hoping to have the improved version ready to roll out after Thanksgiving.
- Breakout Edu - I was able to participate in a Breakout Edu session (my second time doing this) and became certain this is something I would like to do as part of our professional development with staff and can see some applications in the classroom.
- Awesome Keynotes - The Monday keynote was Ramsey Musallam and the Tuesday keynote was Eric Sheninger. You can find videos of their keynotes here, and there should be videos that include their slides up later this year. The big idea I take away from them is this - How are we preparing our students for their future when our teaching practices are stuck in the past?
- Twitter and Voxer make the conference more meaningful - I am part of a Voxer group that came about after last years conference and have connected with so many great educators who were at ITEC thanks to Twitter. It is always nice to get to meet in person the people you connect with online and this makes the conference experience better for me. Being able to continue discussions we have started online or just being able to better connect with people that will help me learn and improve, makes this an even better experience.
These are just the start of my takeways from ITEC. As with any education conference that I go to, it often takes a few weeks for me to go through all of my resources and notes in order to develop my action plans. While the business of the daily grind will distract from this, it can't be forgotten. We need to be constantly evaluating what we are doing and finding ways to improve. While I can learn while not at a conference, being there with others can help strengthen my PLN and allow me to go further than I could alone. I am grateful to be able to connect with so many great educators and look forward to seeing them at the next conference.
Tuesday, October 6, 2015
Getting Your Tweetdeck Ready for ITEC
We are less than a week away from ITEC, Iowa's biggest educational technology conference. This is a great time for educators to come together from across the state, and even those from outside the state, to share how they are transforming their learning environments through the use of technology.
Whether you are at the conference or not, you can learn a lot by following all of the great things people are sharing on Twitter. Besides using Tweetdeck, which is my Twitter tool of choice on a computer, there are some things you can do to make it easier and better as you follow along. The following tips will get you started and hopefully improve your Twitter experience during the conference.
1. Create a new column for conference Tweets.
- Click on the magnifying glass icon to conduct a search. The main hashtag for the conference will be #itecia.

- After you type it into the search box, you can click on the "Add column" button at the bottom to add this column to your Tweetdeck.

2. Add in the other hashtags.
- People don't always agree on the same hashtag when at a conference so you can always search for multiple hashtags at the same time.
- Click on the Settings icon at the top of the column you just created.
- Click on "Content"
- In the matching section, type the main hashtag (#itecia), then type OR and follow that with another hashtag that may be in use that day (#itec15). This will now search for any tweet that contains the main hashtag or the other hashtag and show them all.

3. Unfortunately as the conference hashtags are used more and more during the conference, spambots will show up and start tweeting out spam containing the hashtag if it is trending. You can easily remove those tweets if they start showing up.
- Follow steps 1 and 2 from above but now you will be placing the hashtags the spambot is using, besides the one for the conference, into the Excluding box to remove them. The spambots usually just combine the top trending hashtags into one tweet to share a link that you don't want to click.
- Make sure to include OR between any hashtags you don't want to pop up in your search.

If you follow these steps you will improve the effectiveness of your Tweetdeck experience while being at the conference, or following from the comfort of your home or classroom.
Wednesday, September 23, 2015
Calendar Integration with Google Classroom
Google Calendar is now integrated with Google Classroom.
If you go to classroom.google.com and click on the three horizontal lines, you should see
Calendar as an option.

You can also get to it by going to the About part of your Classroom.

It will be listed towards the bottom. If you have not recently created an announcement or assignment, the Calendar will not automatically be connected to your Google Calendar account. Once you do this, you can click on the link to open your Classroom calendar in your Google Calendar.

Now students, and teachers, can see when all of their assignments and questions are due. This should easily help with workflow.
You can follow the steps listed on the support, site https://support.google.com/edu/classroom/answer/6272985, or watch the video to get more info. If you do not see it now, it should be there very soon.
If you go to classroom.google.com and click on the three horizontal lines, you should see
Calendar as an option.
You can also get to it by going to the About part of your Classroom.

It will be listed towards the bottom. If you have not recently created an announcement or assignment, the Calendar will not automatically be connected to your Google Calendar account. Once you do this, you can click on the link to open your Classroom calendar in your Google Calendar.

You can follow the steps listed on the support, site https://support.google.com/edu/classroom/answer/6272985, or watch the video to get more info. If you do not see it now, it should be there very soon.
Tuesday, September 15, 2015
Use Video To Reflect On Your Teaching
I remember as a student teacher at ISU that I had to record myself teaching using an audio recorder. The purpose of this was so that I could go back and listen to myself teach so that I could analyze what I heard and reflect in order to improve. This is an important procedure that we should always be doing, reflecting and growing as an educator by analyzing our current state.
My issue is that audio does not give you enough information in order to really analyze what is happening in the classroom. While listening to yourself speak can tell you something, you are missing out on a lot of other factors that are happening in the learning environment. You are not looking at how you physically interact with students as well as what the students are doing. The students are the primary learners and we should be focused on what they are doing, not just what the teacher is doing. We can get a clear picture about what is really happening in the classroom by using some video recording tools. The more that we can observe, the more we can reflect on and improve upon.
Part 1: Record the teacher
- There are many ways you can record yourself while in the classroom but luckily we have the ideal tool for this, the Swivl. A Swivl is like a robotic cameraman that will swivel around (hence the name) and point the iPad, or other device, at you while you are in the classroom. The person being recorded wears a microphone and the Swivl uses infrared light to track the motion of the person. This records video of the teacher so we can see what they are doing and hear what they are saying.
- There are other ways to do this without the Swivl such as setting up a camera, or using a smarthphone or tablet, in the back of the room or on the side, but getting audio can be the tricky part. If you move the device closer to the teacher, you get better audio but if the teacher wanders around the room, you may not see or then hear them.
Part 2: Record the class
- Now that we can see, and hear, what the teacher is doing, we need to turn our focus to the students. For this part you can easily just place any recording device in the back of the room (smartphone, tablet, video camera, digital photo camera with video mode, laptop) and hit record. Another option that I think may record more, due to the lense that it uses, is a GoPro. GoPros can have a lot of uses but they are small and record using a wider angle than other cameras. This allows you to see more of the classroom from any recording location. Just make sure that you can see what your students are doing while you are teaching.
Part 3: Analyze and Reflect
- Now that you have your videos, you can watch them to get an idea about how well the lesson went and what you can work on. This is something you can do alone but having another person with you can help you better analyze the situation. They may be able to see things that you don't or they may just be able to ask questions to better clarify what you are seeing. (If you have instructional coaches, these would be very helpful at this point.)
- Compare the videos side-by-side. You can do this by simply opening the videos and hitting play at the same time or you can use something, like iMovie, to combine the videos so you have one to watch.
- Focus on what the students are doing and record any observations that may help you;
- How engaged are the students?
- Does proximity to you affect their behavior?
- How much talking do they do versus how much time you are talking?
- Who is asking the questions and who is participating, are others given other ways they can be engaged?
- How much time is spent as a passive learner versus an active learner?
- Share with others if you want more assistance or just save the videos so you can compare them to future ones. Set a goal you want to work on and determine a timeline before you record again. Focus on how you can improve your awareness of any issues you found and have some steps on how to improve them while also identifying any resources (tools, research, people) you may need to hep you be successful.
Professional athletes use video and coaches all the time to improve, no matter how great of a player they are. We, as educators, can do the same in order to improve as our outcomes are more important than just winning a game - improving student learning.
Tuesday, September 8, 2015
My Top 3 Curation Tools
To be an effective learner today, you need to know how to curate resources. There is a tremendous amount of information out there and if you do not curate your resources, selecting those that are relevant and useful, you will be overwhelmed by what you find. There are a lot of curation tools out there that allow you to do this easily, but there are three that I find myself using more than others, but for different purposes.
Flipboard to share with others
Flipboard to share with others
- Flipboard is my curation tool of choice when I want to curate general resources to share with others. I have multiple magazines that each have their own topic, as well as other magazines which are focused on resources from various conferences I attend. Flipboard looks the best of the three I use and has dedicated web and mobile apps. As with all of my curation tools, make sure you install the Chrome extension so you can easily add to your collection. Flipboard also can be used with others as co-curators so this can be a collaborative effort.
Pocket to share with myself
- Pocket is my app of choice when I am curating just for myself. This is usually related to specific information I am looking for based on my current needs. I quickly add to my Pocket resources and then go back to them later on my phone or tablet. Again, the Chrome extension makes this easy to curate and the app makes it easy to get back to it. It does not have the same looks as Flipboard and does lack the collaboration aspect which is easy to get with others. It works great though when I am focused on curating a specific set of info.
Padlet to share during presentations
- Whenever I am giving a presentation or working with teachers from another school, I make a Padlet wall to curate resources related to our topics. I also make it so they can add their own resources to share with others. This is a benefit to Padlet as you can easily make it so people can add to a Padlet without them being able to remove or edit other entries. You can easily link to the Padlet or embed it on a Google Site. Installing the Chrome extension should be the first thing you do. Padlet looks great and can automatically sort into a grid pattern based on the entries.
It doesn't matter what tools you use as long as you are organized and can curate resources instead of just collecting them or forgetting them. You don't have to use different tools for the different purposes but I have found it helps me to better organize what the purpose of that resource is before I curate it. If you are sharing your curations with others, make sure you look to those that are easy to share and look pleasing to others.
You can watch the video below to see my three curation tools in action and search my sites for other resources related to these tools.
Friday, September 4, 2015
September Ed Tech Challenge
As a fun way to introduce some more collaboration, sharing, and a challenge, we are introducing Ed Tech Challenges for our staff each month. This first month is just get teachers introduced to the idea and get them sharing out what new things they are trying out in the classroom, or to help them get ideas about what else they could be trying. This is my way of working towards some of the 4C's (collaboration, creation, critical thinking, and communication).


There are various challenges that can earn teachers points and I will keep track of them using a Padlet wall or by watching the #ameshighpride hashtag on Twitter. The Padlet wall is also an easy way for teachers to share what they are doing so other teachers can see it. While the reward to the winner is some homemade treats, made by my wife or me depending on what they choose, the real reward will come in the collaboration they experience and the ideas they can get from working with each other. My hope is to have a theme each month to help us focus on our growth areas and to keep the learning going.
Thursday, September 3, 2015
Awesome Updates to Google Apps
Google just released some new updates to various Google Apps that will be some nice improvements for use in the classroom. You can find their post about the updates at http://googleappsupdates.blogspot.com/2015/09/do-your-best-work-with-google-docs.html but I wanted to go over the top updates for the classroom.
1. Voice to Text in Google Docs


1. Voice to Text in Google Docs
- While there have been some Chrome extensions that offered voice to text features, having it built in to all Google Docs on the web or through an app makes it much easier to use. Voice to text can be really useful as an assistive tool for students who have issues when it comes to writing but can explain their ideas more effectively. This is also useful to help students record their thoughts or to help them get started writing out something that may be a bit more complex. You can quickly find the Voice tools under the "Tools" tab.

2. Templates
- Google has finally made templates available in various Google Apps. By clicking on the Home button in Docs, Sheets, or Slides; you can create a new doc using any of the various templates provided. A lot of these will be really useful to students as they prepare reports, resumes, or other types of docs where a template helps to organize it.


3. Explore tools in Sheets
- Google has also made it much easier to "see" your data in a Google Sheet using the Explore tools. This tool will quickly create graphs and charts based on the data in your sheet. This could make it much easier for both students and teachers to be able to make sense of and use data to make informed decisions or conclusions.

4. New Google Forms
- Google has also updated Google Forms with a new layout and tools. You have to "opt-in" right now to get access to the new Forms but you can still leave them to get back to the old Forms. Go here to opt-in to the new Forms. Mostly, they layout while editing the Forms looks more up-to-date and will be easier to use for people new to Forms. Others, who have used Forms extensively, will of course have to take some time to get used to the new layout. The looks are not the only things to change as you have new customization options and the results will now appear in the same page as the Form editing.

There are some other updates to Google Apps included in this but you can find out about all of them by clicking the link above to get to Google's blog post. You can also watch the video below to see some of the updates in action.
Tuesday, September 1, 2015
What To Do If The Turn In Button Is Missing In Classroom (For Students)
Occassionaly there will be a little glitch with assignments created in Classroom where the "Turn-in" button is not showing up in a Google Doc (or other Google App file) for students to submit from the file. When this happens, all they have to do is to add the file as an attachment to turn it in. Watch the video below to see how this is done.
Monday, August 31, 2015
Flipboard to Move Beyond the Textbook
While a textbook can be a good resource, it no longer has to be our only resource. Curation tools, like Flipboard, can help you to put together resources to help your students learn. There are many resources out there are that are more up to date than a textbook or more engaging. We can find resources that help all levels of readers in our classroom while also using resources that are more interactive and responsive to students. We can even collaborate using the curation tool to work with another teacher to maximize our time.
Flipboard is one of the best curation tools out there in terms of aesthetics and ease of use. Using a Chrome extension (https://chrome.google.com/webstore/detail/%2B-flip-it/fbmppankahdodchhioklnbcmohehhjoa?utm_source=chrome-ntp-icon) you can quickly add any website to your magazine (except for Google docs, sheets, slides, drawings). Students can access the Flipboard magazine using the link or by following your magazine with their own account. The magazines look great, both online and using a dedicated smartphone or tablet app. You could create magazines for each section, unit, term, or whichever way you want.
The following are all Flipboards that I have created or collaborated on.
- Teaching in a 1:1 Environment
- Formative Assessment
- Google Apps for the Classroom
- Digital Citizenship
- Iowa 1:1 Conference Resources - curated by a group
- ISTE 2015 - curated by a group
Watch the following video to see how to get started and how it works.
Friday, August 28, 2015
Tech Tips Newsletter #201
Today we are starting the biweekly newsletters back up so you can get some tech tips in email form every two weeks. You will be able to find all of the newsletters and other useful information on our site bit.ly/ahstechint and new tech tips will be posted to my Blogger page at http://ahstechtips.blogspot.com/ (the tech tips on that blog page are automatically updated to the front of my Google Site).
- Updates to Google Classroom
- Synergyse for Google Apps Help
- Use Videonot.es to take notes on videos in Google Drive or YouTube
- Updated Comparison of Backchannel and Informal Assessment Tools
- 10 Awesome Tips for Teachers Using YouTube in the Classroom
- Copyright and Creative Commons Explained
Remember that if you have something you are trying out in your classroom that you want to share with others, we do have a teacher share page at https://sites.google.com/a/ames.k12.ia.us/ahs-technology-integration/home/teacher-sharing. There are a lot of great uses of technology to improve learning in our classrooms and sharing them out can help each other out greatly.
Friday, August 21, 2015
Create Animated Gifs Using Snagit
Animated GIFs are great tools to show students/teachers/others how to do something without having to create a full video to host online. You can quickly create animated GIFs using Snagit for Chrome, https://chrome.google.com/webstore/detail/techsmith-snagit-extensio/annopcfmbiofommjmcmcfmhklhgbhkce?utm_source=chrome-ntp-icon, by doing a quick screencast and then converting it into an animated GIFs. There are other extensions, like MakeGif (https://chrome.google.com/webstore/detail/makegif-video-capture/cnhdjbfjheoohmhpakglckehdcgfffbl), that allow you to capture part of online videos, like YouTube, to convert part of it into an animated GIF. Snagit allows you to do a screen capture video and convert that into an animated GIF.
If you want to put the animated GIF onto your Google Site, you need to use the link to the file, but for other uses you can just download and insert it. I use animated GIFs all the time for my presentations so I do not have to leave the presentation to show them how to do something. You can easily use this with students as part of instructions or when you are trying to help someone else learn how to do something quickly.
Watch the video below to see how you can do this easily.
Thursday, August 20, 2015
Synergyse for Google Apps
We have a great new resource available to us in regards to learning how to use Google Apps in the classroom. Synergyse is a tool designed to help people learn about the various Google Apps. By installing the Chrome extension, https://chrome.google.com/webstore/detail/synergyse-training-for-go/idkloemkmldbemijiamdiolojbffnjlh?utm_source=chrome-ntp-icon, you will have Synergyse available whenever you are using a Google Apps product.
You will see the Synergyse logo at the top right of the page and will have quick access to resources centered around that one, specific app.

This tool is available to all staff and students. It will already be installed on the Chromebooks at the MS and can be installed using the Chrome extension on all other laptops.
Watch the following video to see how to get started with Synergyse.
You will see the Synergyse logo at the top right of the page and will have quick access to resources centered around that one, specific app.
This tool is available to all staff and students. It will already be installed on the Chromebooks at the MS and can be installed using the Chrome extension on all other laptops.
Watch the following video to see how to get started with Synergyse.
Friday, August 14, 2015
Swivl Tips and Tricks
The Swivl is a great device to help a teacher, or other educator, record video of the many things that we do during the day. You can easily put in a tablet or phone and the Swivl will track your motion using the microphone that you wear so you do not need an assistant, it is your assistant. The Swivl has a small footprint and easily blends into the background once you start using it, although I love seeing people's reactions when they first watch it rotate to follow your motion. The app that you need to install on your device is free and connects you to their cloud storage which is a great place to store and share the videos that you make. We have used this to record teachers teaching, record students giving presentations, and record any presentation that we want to give. I have also worked with teachers to set them up so they can record experiments or any other events that they want to share out with students, or other educators.
Getting Started
- Set up account at http://cloud.swivl.com/
- Install the Swivl app on your iPad or other mobile device.
- Log into your Swivl Cloud account on the Swivl App.
- Change Video Settings to medium sized video if you do not have enough storage for a high quality video.
- Turn on and connect to the iPad.
- Upload your video to your Swivl Cloud account, you can even set it to automatically do this after you record.
- (one issue that has popped up occasionally involved some interference with the microphone causing it to not record, if you turn off the wifi on your tablet or phone then you can usually avoid this issue)
Watch the videos below to get started with your Swivl.
Getting Started With Your Swivl
Uploading From Swivl to Swivl Cloud
Tips When Using Your Swivl
Thursday, August 13, 2015
Add To Google Classroom Chrome Extension
Over the summer Google introduced new ways to connect Classroom with other sites and tools. While it will take some time for other sites and tools to integrate with Classroom, you can now easily add resources to your Google Classroom using a simple Chrome extension. All you have to do is be on the site you want to share and click the Chrome extension. You can decide if the resource is going to be part of an "Announcement" or "Assignment". You can even set it as a Draft so you can share it later when you want to.
Just go to https://chrome.google.com/webstore/detail/add-to-google-classroom/oaobmlmjmhedmlphfdmdjpppjmcljnkp/related?utm_source=chrome-ntp-icon to get the extension.
Just go to https://chrome.google.com/webstore/detail/add-to-google-classroom/oaobmlmjmhedmlphfdmdjpppjmcljnkp/related?utm_source=chrome-ntp-icon to get the extension.
Wednesday, August 12, 2015
Newsela - Nonfiction Leveled Readings
Newsela is a great resource for any classroom. It is a site that has a collection of nonfiction articles and stories, including current events articles, that allow you to select the reading level you need to understand the text. There are usually 5 levels available for students so they can select the level that best suites them, or work on a level that is within their zone of proximal development so that they can continue to learn and improve. There is even a feature, not available for all articles but for many, that gives you a chance to take a quiz that will assess how well you understood the article.
Newsela is free, although there are some paid options, and allows you to easily create teacher and student accounts using your Google Apps log-in. The Pro account gives you more of the LMS features that many would like but that are not needed for most applications of this tool. In the free account you can assign articles to students and they can take the quizzes after certain articles, however the teacher will not be able to see their results.
Newsela provides some great supports for teachers, including a handy sheet telling you how to easily get students registeredand a quick start guide for teachers for the overall process of using it. Newsela is used by a good amount of teachers at our school and they have the following to say about it;
- It is nice to use to read to the class for Read Alouds, but it is also nice to give to kid at different lexile levels. That way they can all read the same article, but with varying degrees of difficulty.
- I created an account and had freshman look through, find a story, read it, then summarize it and give their opinion on it. It was really nice because they could chose their lexile for the passage and as they were reading if it was too hard they could decrease the lexile until they understood it. And it is relevant information on all subjects. It did a better job at giving students access to non-fiction articles at their reading level then I ever could do on my own.
- I use it every week for my AI students. Sometimes I keep the lexile high for a Think Aloud, but other times I lower it based on their individual lexile range. It's great!
Watch the video below to get started.
Actively Learn - Add Notes/Questions/Resources to Text
Actively Learn is a digital tool that allows you to easily add notes/questions/resources to digital texts, ones provided for you or ones that you upload yourself. You can easily create a class, add students, add the text and resources; all in a very short time. Students then can use the notes/questions/resources you provide to help them make sense of the reading and improve as readers. There are a lot of free options that you will find useful for your students and some of the premium options even make it worth buying, if you have the funds.
(They even have resources from Project Gutenberg such as The Great Gatsby.)
Watch the video to see the basics of Actively Learn and then start thinking about how you can use it to help your students as they read.
Adding Audio Comments using Goobric and Doctopus
I am a big proponent of using digital tools to provide better feedback for students as part of their learning. Too often we may give "feedback" that consists of a score or a grade, which does not help the student continue in their learning in an effective way. It is like expecting a blind person to know how to drive by just shouting out directions, we need to do more to help them become better in their learning. Kaizena is my standard tool for adding audio comments to Google Docs but if you are already using Goobric and Doctopus, then you can now easily add in audio comments to give further feedback for the student.
(If you are worried about the time it takes to give better feedback, think of the time you will get back because the better feedback will make it more likely they learn and will need less help than if you give them poor feedback.)
You can find out more about Doctopus and Goobric at http://cloudlab.newvisions.org/add-ons/doctopus and you can watch the video below to see how to leave audio comments using Goobric.
Chalkup to Annotate Google Docs
Chalkup is a useful tool in many ways, as an LMS (lesson management software) or even just as a way to annotate Google Docs for students. Chalkup has the usual features of being able to create classes, have students join using their Google accounts and a classroom key code, discussion posts, creating assignments, and all of the other features you expect from a type of LMS.
The one feature that really helps it stand out from others is that you have the ability to annotate Google Docs in many ways, such as leaving comments or even drawing on the document. The annotations are only found when logged into the Chalkup site and you will not be able to see them on the original Google Doc, only the copy in the assignment submission. There are a lot of people who want this feature and this is one of the few easy ways I have found to be able to do this.
(sidenote: There are a lot of ways that we can leave effective feedback for students, we should look for new ways that allow us to leave better feedback that helps our students as learners so make sure that any feedback you give to students is effective, not just quick.)
Chalkup is easy to setup and join, thanks to using your Google account, so you can easily create a class and start trying it out. Watch the video below to see how to get started. Richard Byrne has also written some great posts about Chalkup, including about their rubric features, at http://www.freetech4teachers.com/2015/02/chalkup-grade-assignments-in-google.html#.VRQB6zvF9g4.
Subscribe to:
Comments (Atom)